
How to Wrap a Flower Bouquet

The convenience of picking up flowers at the store is so great. It is nice being able to know you can grab a bouquet whenever you need some flowers for any occasion. But, my biggest issue with these bouquets you can grab and go is that they are wrapped in cellophane and have little shape to them. I love when you see a flower bouquet that really shows off all of the flowers and looks a little more elegant!
When I was teaching flower design my classes would make simple bouquets wrapped in tissue paper to use for sport teams senior nights and more. They were a perfect way to display just a few flowers and have them wrapped up and easy for the athletes and their parents to have and take home with them. If you want to gift someone a flower bouquet and have a little extra time I highly recommend following these easy directions and taking a few minutes to wrap them up in some tissue paper and tie them with some ribbon. They will look great and the recipient will love them!
Below is a list of materials and step by step directions with pictures to help create one of these cute bouquets. In the list of materials I have put a link to Amazon in case you want to check out exactly which tissue paper and water tube products I used.
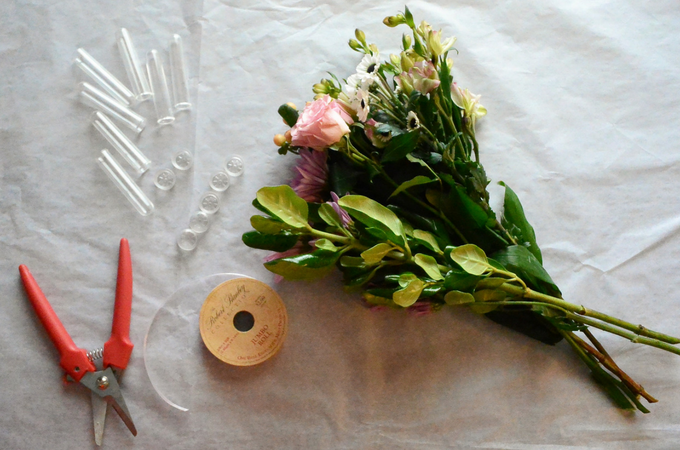
Materials:

- 2 sheets of White Tissue Paper
- Just a warning that if you want to purchase wax floral tissue paper that it usually has to be bought in bulk. Regular tissue paper will work fine, it just does not have the wax consistency and will soak up any water that you spill on it and could tear.
- Rose Flower Water Tubes
- Water
- Bouquet of Flowers (any mix you like!)
- Ribbon (Any ribbon you like is great as well!)

Creating a Flower Bouquet...
Give each flower a fresh trim at an angle; put end of stem in water tubes...


Water tubes are perfect to keep flowers in a bouquet fresh for longer. Fill them about halfway with water and securely put the lid on each one.
Trim flowers at an angle makes it easy to get them in water tubes.
Once flowers are in the water tubes they are designed not to leak unless they are overfilled with water.
Lay tissue paper out flat on table and place a flower or green on it...

The flower or green you place on the tissue paper should only go to the corner and should not hang over the top.
Place flowers on tissue paper, layering so you can see each one...

Fold bottom corner up over bottom of flowers...

This will hide all of the flower tubes and keep any flowers from falling out.
Fold down right corner of tissue paper so it does not hide any flowers...

Lay right side of tissue paper over top of flowers and tuck underneath flowers...

Wrap remaining tissue paper around the stems until it runs out...

Tie ribbon around middle of tissue paper...

Tie it tight enough to hold everything together, but not too tight.
There you go! A simple bouquet that is made to look more elegant and will last longer with water tubes on the flowers! Enjoy!
If you love flower design you will love some of my other tutorials: