
How to Easily Build Rustic Wood Shelves

A step by step tutorial on how to easily build rustic wood shelves to majorly improve storage in any home office or school space! Building wood shelves has created the perfect virtual learning home set up for our family!
A home school/office suddenly became a necessity for us in early August. While we were not in a pressing need for a home office space for the past few months, our son was starting virtual learning for 1st grade and we knew he was going to need a work space. We decided to turn a corner of our play room into a school space by adding a desk. While on the search for a desk we quickly came to find out that the demand for desks was incredibly high and most were sold out or back ordered everywhere. After searching for a while we finally came across a great rustic style desk on Overstock and it was available! While it is a great desk it lacks any storage for school supplies. So, we decided to build and add matching wood shelves above it. They work perfect for what we need!
Below I've shared all of the materials needed to build these shelves and a full step by step tutorial. I hope it can help anyone looking to add a little more home office/school storage or just in need of some cute rustic shelves!
Materials Needed...
These are the exact materials we used to make two shelves. I linked anything I could to help you find items we used.
Wood Shelves:
Minwax Stain:
Aged Barrel
Red Mahogany
Espresso
120 grit Sandpaper
220 grit Sandpaper
Brackets:
2 sets of IKEA GRANHULT Brackets
Building Rustic Wood Shelves...
Paint Brackets...

IKEA GRANHULT Brackets
We choose to use the IKEA GRANHULT Brackets because they were inexpensive and would be easy to paint to match the black metal on the desk we purchased. You can purchase a shelf from IKEA that goes with these, but they are made of laminate instead of solid wood and did not come in a color that complimented our new desk.

brackets and scuff pad
To prepare the brackets to be painted they need to be scuffed with the scuff pad. After scuffing be sure to wipe off with a microfiber cloth to remove any dust.

brackets painted flat black
Spray paint the brackets with the flat black paint. Be sure to also scuff and spray the anchor screw heads so that they match the brackets.
Purchase Three Pine Stair Treads...

pine stair tread
The brackets are made for an exact 1" thick shelf (like the laminate ones sold at IKEA). At Home Depot a nominal 1-by board is typically only 3/4" thick, so instead we bought pine stair treads which are exactly 1" thick so they will fit the thickness of the bracket.
While it will fit the thickness, one stair tread is not deep enough to fit the entire bracket. So we bought a third stair tread to cut and add the additional depth needed to each board.
Cut Wood to Size...
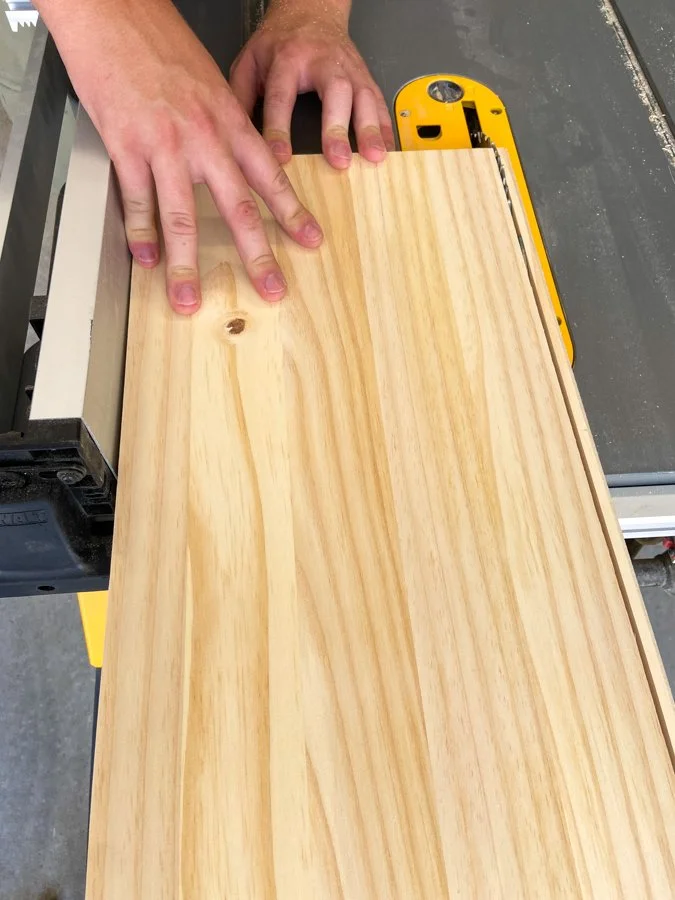
cutting bull nose off stair tread on table saw
Using a table saw cut the bull nose (rounded edge) of the stair tread off first. This creates a square edge on one side, but then the board is not deep enough to fill the 12" bracket, so edge gluing an additional piece is necessary. We ripped another inch or so off the other side to square up that edge and also shorten the depth so the edge glued piece isn't just a sliver of wood (the treads are 11-1/2" deep from the store).

cutting wood shelf to length
Using a chop saw cut the boards to the width that you would like for the shelves. We needed 3 foot shelves to fit our space.
Glue and Clamp Wood Shelf Together...

gluing wood shelf together
You can see the additional piece needed to make the shelf the correct depth.

preparing to wood glue pieces together
Put wood glue on the edges of both boards.

wood shelf glued and clamped
Glue the pieces together and clamp them to hold it tight and allow it to dry. Keep clamped at least 1 hour.
Sand Shelves...

hand sanding the wood
After gluing you will need to sand the shelves. This will help remove any excess glue that may have dried on the shelf and also give it a finished look and feel. We first sanded with a power sander and 120 grit sand paper. Then we did hand sanded using 220 grit sand paper.
Be sure to thoroughly wipe down sanded boards with a microfiber cloth or tack cloth to remove dust and wood particles.
Stain and Polyurethane Wood...

three stains used to get the correct color shelf
We were trying to stain our wood to match the desk that we bought. It took a little guess work to match the colors. In the end we stained it with three different colors to achieve the perfect color. The first coat was Aged Barrel, second coat was the Red Mahogany, and third coat was Espresso.
After staining allow to dry for 24 hours. Then apply two coats of rub on polyurethane. Allow to sit for another 24 hours to dry.
Attach Brackets...

close up of the bracket connected to the wood shelf
Attach the brackets to the finished pieces of wood. Simply slide the brackets onto the ends of the wood and screw the brackets onto the wood on the bottom side. The screws to attach the brackets to the shelf come with the brackets.
Hang Shelves...

rustic wood shelves hung on the wall
We used wall anchors and screws to hang the shelves on the wall.
Perfect Rustic Wood Shelves for a Home Office/School Space!

wood shelves set up with supplies for virtual learning

rustic wood shelves for home school set up

looking at the sides and brackets of the new wood shelves

home office or home school desk set up

home school desk set up with new shelves